
YITH WooCommerce Subscription WordPress Plugin With Lifetime Update.
$199.99 Original price was: $199.99.$19.90Current price is: $19.90.
YITH Product Shipping for WooCommerce WordPress Plugin With Lifetime Update.
$79.99 Original price was: $79.99.$18.90Current price is: $18.90.
YITH WooCommerce Multi Vendor / Marketplace WordPress Plugin With Lifetime Update.
$149.99 Original price was: $149.99.$50.00Current price is: $50.00.
YITH WooCommerce Multi Vendor / Marketplace WordPress Plugin With Lifetime Update.
| Features | Values |
|---|---|
| Version | v4.9.0 |
| Last Update | 2023-04-18 |
| Documentation | Yes |
| All Premium Features | Yes |
| GPL/Nulled | No |
| Instant Installation Support | 24 Hrs. |
| Receive Updates on Email | Yes |
| Website Activation | 25 |
🌟100% Genuine Guarantee And Malware Free Code.
⚡Note: Please Avoid Nulled And GPL WordPress Plugin.
12
Items sold in last 3 minutes
187
People watching this product now!
Category: YITH Original
Description
YITH WooCommerce Multi Vendor / Marketplace WordPress Plugin With Lifetime Update.
Turn your e-commerce store into a marketplace (a multi-vendor platform) and earn commissions on orders generated by your vendors.
How you can benefit from it:
- Quickly and easily create a complex marketplace environment like the ones on AliExpress, Amazon and Etsy, starting from your WooCommerce-based shop.
- Handle your e-commerce store without the hassle of monitoring orders, shipping, stock, etc. Every step of the sale process will be managed by vendors autonomously.
- Generate passive income with a percentage commission on all sales made by the vendors, that is the users allowed to publish products in your store.
- Increase your e-commerce popularity and stability thanks to a wide and varied catalog that is constantly expanding.
YITH WooCommerce Multi Vendor / Marketplace Features.
- Vendor registration
- Create the vendor registration page using the shortcode or the built-in Gutenberg block
- Customize the registration form: add/remove fields, sort them, make them mandatory New
- Require vendors to accept the Terms and Conditions on registration
- Require vendors to accept the Privacy Policy on registration
- Choose whether to automatically approve vendors’ applications after the registration or not
- Approve or reject vendors manually after the registration
- Enable or disable a vendor’s profile
- Add a registered user as a new vendor manually
- Add a new vendor manually and create a new user profile simultaneously New
- Vendors’ permissions
- Let vendors use an advanced editor to set their shop description
- Choose whether to set a maximum number of products for each vendor to publish or not
- Choose whether to let vendors publish their own products straight away or to make them wait for the admin’s approval
- Choose whether to let vendors edit their own products straight away or to wait for the admin’s approval
- Set the vendor’s permissions concerning their own products and decide if they can create coupon codes, assign tags, set some products as “featured” and manage reviews
- Set the vendors’ permissions concerning their own orders and decide if they can manage refunds, view the payment, shipment and billing info, and get in touch with their customers by email
- Let vendors temporarily close their shops and decide if they want to stop sales for that period of time
- Let vendors create their own crew and set permissions for each member (decide if the crew members can add products, access the reports, manage refunds and coupons, etc.) New Hot
- Enable advanced shipping management for vendors: they will be able to create their own shipping zones, set shipping methods and costs, show shipping and refunds terms, set the country from where the items will be shipped, etc. Hot
- Vendors will have access to advanced reports about their own orders, stock and generated commissions
- Commissions options
- Set a global commission rate for all vendors
- Set a specific commission rate for selected vendors
- Set a specific commission rate for selected products
- Choose how to calculate the commissions on orders with coupons: calculate the commission based on the full price of the product or on the discounted price New
- Choose who will get tax credited to their accounts: credit tax to the admin, to the vendor or split it between the admin and the vendor
- Monitor the generated commissions in the dedicated table (you can filter them by status, vendor, date, etc.)
- Pay commissions manually and mark them as “Paid”
- Use either Stripe Connect or PayPal Payouts payment gateways to automate the payment of vendors’ commissions
- Use either Stripe Connect or PayPal Payouts to split the payment and automatically associate the admin’s and vendors’ commissions on checkout Hot
- Use YITH WooCommerce Account Funds to create a virtual wallet and convert the commissions into funds that can be used for orders on the shop
- Notify the commissions payment by email
- Export the commissions into a CSV file New
- Products and Shop pages options
- Show a “Vendor” tab on the product page with the vendor’s name and description
- Choose the position of the “Vendor” tab (first tab or after WooCommerce tabs)
- Choose whether to display the vendor’s name on the Shop page and on the other WooCommerce pages
- Choose whether to show the vendor’s name on the product page
- Choose whether to show the vendor’s total orders on the product page
- Choose whether to show only products of the same vendor in the “Related products” section
- Enable the “Report abuse” link on all products or only on vendors’ products
- Choose the layout for the Shop page (3 layouts available) New
- Set the vendor’s header size and colors
- Show a default header and logo for all vendors that do not upload their own headers
- Decide what vendors’ details to show on the vendors’ store page: description, VAT, address, phone number, email address, website, total sales, reviews average rate, social profile links, etc.
- Use the YITH Vendor Store Location widget to show a map using Google Maps on the vendor’s store page
- Use the YITH Vendor Quick Info widget to show a contact form (to all or only logged-in users) on the vendor’s store page
- Choose whether to copy the site admin on all emails sent through the Quick Info widget contact form
- Admin advanced options
- Set a slug to identify all the vendors’ store pages
- Customize the “vendor” and “vendors” labels
- Choose whether to hide the vendors’ products from the main Shop page (these will be visible only on the vendors’ store pages)
- Choose whether to hide the products of the “temporarily closed” vendor shops
- Choose whether to hide the “Customers” section from vendors in the orders details, so they cannot see them
- Choose whether to force vendors to read and accept the Terms and Conditions, and the Privacy Policy every time they are updated
- Use the yith_wcmv_vendor_products shortcode to show the products of specific vendors only (and optionally filter them by ID, category, tag, etc.)
- Use the built-in widget to show a list of all the vendors on every page of your shop
- Show a dashboard notification when a new vendor registers
- Enable a separate order management for every vendor
- Enable the orders synchronization: this will sync any changes made to the main orders also on the related vendors’ orders
- Bulk assign products to each vendor
- The super admin can create the vendors’ orders from the backend New
- Set custom messages to show on every vendor’s dashboard New
- Set custom messages to show on the dashboard of specific vendors only New
- Set custom messages to show to specific vendor groups (like “featured” or “reported” vendors, vendors who reached a certain number of sales or earnings, etc.) New
- Monitor the shop through an advanced dashboard where you can view reports on sales, commissions and earnings, all filterable by custom date ranges, vendor, product etc.
🌟100% Genuine Guarantee And Malware Free Code.
⚡Note: Please Avoid Nulled And GPL WordPress Plugin.
Reviews (0)
Only logged in customers who have purchased this product may leave a review.
Installation Process
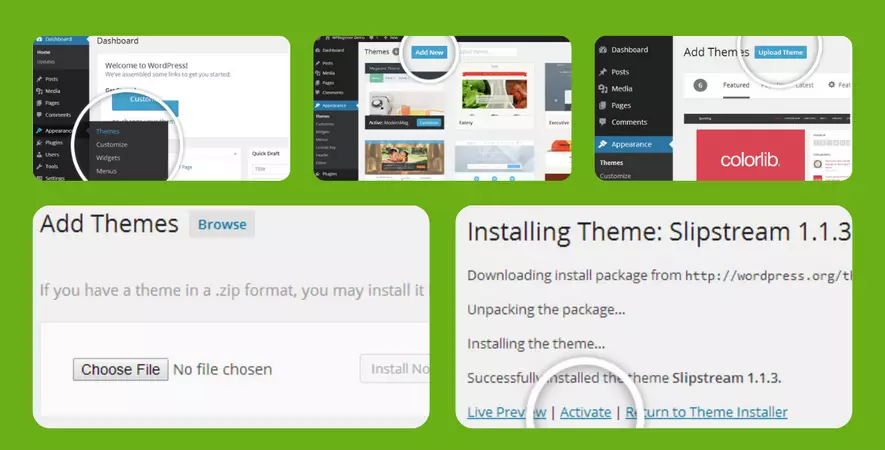
WordPress Theme Installation
- Download the theme zip file after purchase from CodeCountry.net
- Then, log in to your WordPress account and go to Appearance in the menu on the left of the dashboard and select Themes.
On the themes page, select Add New at the top of the page.
After clicking on the Add New button, select the Upload Theme button.
- After selecting Upload Theme, click Choose File. Select the theme .zip folder you've downloaded, then click Install Now.
- After clicking Install, a message will appear that the theme installation was successful. Click Activate to make the theme live on your website.
WordPress Plugin Installation
- Download the plugin zip file after purchase from CodeCountry.net
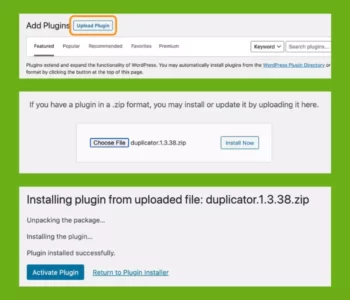
- From your WordPress dashboard, choose Plugins > Add New
Click Upload Plugin at the top of the page.
Click Choose File, locate the plugin .zip file, then click Install Now.
- After the installation is complete, click Activate Plugin.
Certification

This certificate represents that the codecountry.net is an authorized agency of WordPress themes and plugins.



Reviews
There are no reviews yet.