WooCommerce Appointments 4.19.0 With Lifetime Update.
$6.90
| Features | Values |
|---|---|
| Version | v4.19.0 |
| Last Update | 20 April 2024 |
| Premium Features | Yes |
| Instant Installation Support | 24 Hrs. |
| Scanned By Virus Total | ✅ |
| Live Preview | 100% Working |
WooCommerce Appointments is the perfect plugin for handling appointments on your own website. Fully integrated with WooCommerce, WordPress and Google Calendar. It is the best appointment scheduling software you can get right now. Request payments or accept appointments for free. This WooCommerce extension allows you to receive payments for appointments with little to no effort.
WooCommerce Appointments WordPress Plugin Features
- Built on WooCommerce
- Quick Setup
- Extra Form Fields New!
- 2-way Google Calendar sync
- Staff Management & Login
- Flexible Availability Rules
- Flexible Capacity Rules
- Flexible Pricing Rules
- Timezone Conversion
- REST API New!
- Multi-days Scheduling
- Charge for Service Delivery
- Scheduling window, Lead time
- Padding / Buffer time
- Confirmation / Cancellation
- Insert as Shortcode
- Multilingual / Multi-currency
- Developer Friendly
- White Label
🌟100% Genuine Guarantee And Malware Free Code.
⚡Note: Please Avoid Nulled And GPL WordPress Plugins.
Only logged in customers who have purchased this product may leave a review.

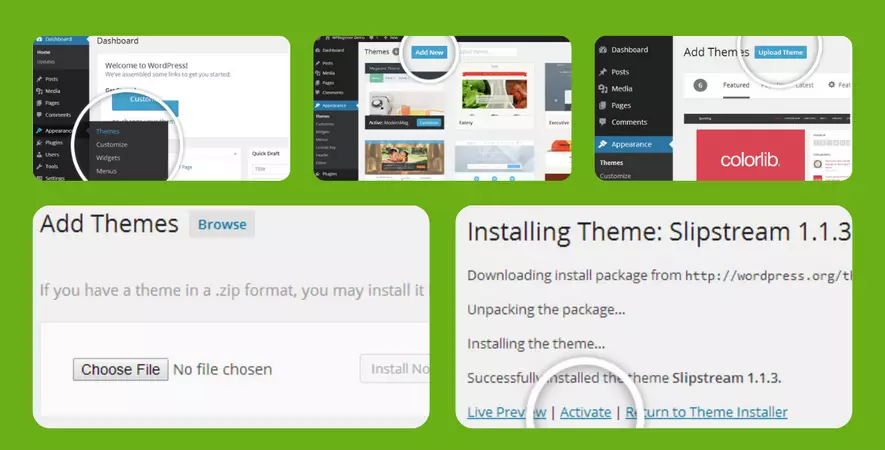
WordPress Theme Installation
- Download the theme zip file after purchase from CodeCountry.net
- Then, log in to your WordPress account and go to Appearance in the menu on the left of the dashboard and select Themes.
On the themes page, select Add New at the top of the page.
After clicking on the Add New button, select the Upload Theme button.
- After selecting Upload Theme, click Choose File. Select the theme .zip folder you've downloaded, then click Install Now.
- After clicking Install, a message will appear that the theme installation was successful. Click Activate to make the theme live on your website.
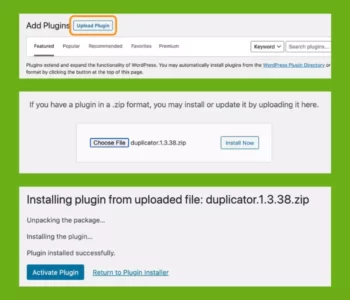
WordPress Plugin Installation
- Download the plugin zip file after purchase from CodeCountry.net
- From your WordPress dashboard, choose Plugins > Add New
Click Upload Plugin at the top of the page.
Click Choose File, locate the plugin .zip file, then click Install Now.
- After the installation is complete, click Activate Plugin.


This certificate represents that the codecountry.net is an authorized agency of WordPress themes and plugins.


Reviews
There are no reviews yet.