YITH WooCommerce Mailchimp WordPress Plugin With Lifetime Update
$13.00
YITH WooCommerce Mailchimp WordPress Plugin With Lifetime Update
| Features | Values |
|---|---|
| Version | v1.17.0 |
| Last Update | 12 March 2023 |
| Documentation | Yes |
| All Premium Features | Yes |
| GPL/Nulled | No |
| Instant Installation Support | 24 Hrs. |
| Receive Updates on Email | Yes |
| Website Activation | 25 |
🌟100% Genuine Guarantee And Malware Free Code.
⚡Note: Please Avoid Nulled And GPL WordPress Plugin.
16
Items sold in last 3 minutes
170
People watching this product now!
Category: YITH Original
Description
YITH WooCommerce Mailchimp WordPress Plugin With Lifetime Update.
The best way to integrate Mailchimp functionalities to plan focused and effective marketing campaigns.
How you can benefit from it:
- You will be able to register your e-commerce customers to MailChimp lists in an easy and fast way;
- You will be able to outline your customers depending on their preferences;
- You will be able to create focused campaigns for every customer type.
YITH WooCommerce Mailchimp Features.
- Integrate WordPress and WooCommerce with your MailChimp profile, by letting your customers automatically subscribe one of your lists during checkout.
- Register new users as soon as their order is either placed or completed.
- Show a checkbox to let them explicitly allow subscription or not.
- Send a confirmation email on subscription or not (double opt-in – handled by MailChimp).
- Update a user that is already registered to the list or not.
- Send a “Welcome email” to newly subscribed users (welcome email – handled by MailChimp).
- Specify interest groups for new subscriptions during checkout.
- An advanced selection mode that allows you to add a user to more than one lists and specify interest groups (if any) for each of them.
- In advanced mode, associate WooCommerce checkout fields to MailChimp list fields, so that users’ profiles are automatically populated.
- In advanced mode, specify conditions for new subscriptions to the list.
- Store integration: you can create campaigns targeted at customer purchasing preferences, handle abandoned carts, and check revenue from newsletter campaigns directly from Mailchimp Dashboard NEW
- Use a shortcode to print on the screen an AJAX form for registration to the list.
- Select lists and groups for new user registrations and let users subscribe the newsletter upon registration
- Select fields that will be printed in the form, handling the different types of MailChimp fields and mandatory fields.
- Sync procedure, to register existing customers and orders to MailChimp NEW
- Customize form style using an easy-to-use panel.
- Use a widget that prints a subscription form to a specific list.
- Select lists and groups even in the widget.
- Select and sort fields even in the widget and handle them according to the field type.
- Customize the widget from the options panel.
- Export a set of your e-commerce users into a MailChimp list.
- You can either filter users and distinguish them between users and customers or filter them using parameters concerning their orders.
- Export users into a CSV file and use it in management software.
- Display a widget in WordPress dashboard with statistics about user-defined lists.
- Integrate eCommerce360 to track purchases deriving from a MailChimp campaign.
🌟100% Genuine Guarantee And Malware Free Code.
⚡Note: Please Avoid Nulled And GPL WordPress Plugin.
Reviews (0)
Only logged in customers who have purchased this product may leave a review.
Installation Process
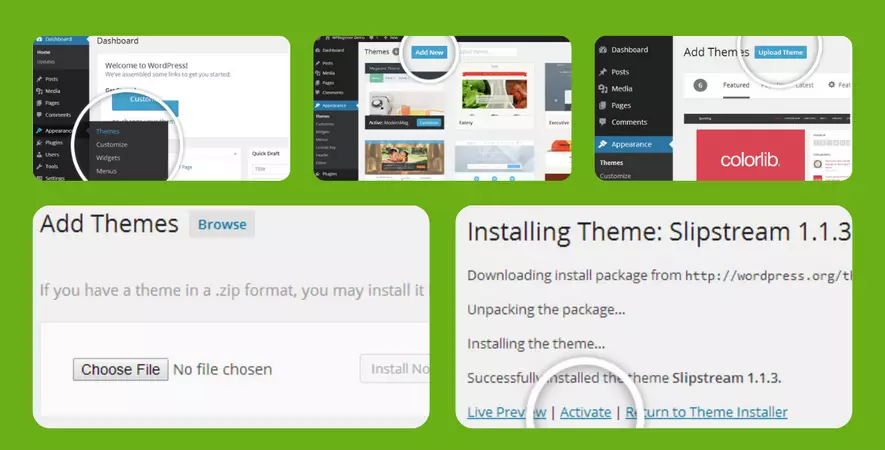
WordPress Theme Installation
- Download the theme zip file after purchase from CodeCountry.net
- Then, log in to your WordPress account and go to Appearance in the menu on the left of the dashboard and select Themes.
On the themes page, select Add New at the top of the page.
After clicking on the Add New button, select the Upload Theme button.
- After selecting Upload Theme, click Choose File. Select the theme .zip folder you've downloaded, then click Install Now.
- After clicking Install, a message will appear that the theme installation was successful. Click Activate to make the theme live on your website.
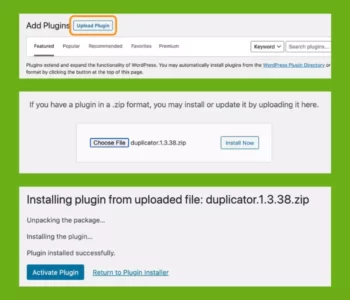
WordPress Plugin Installation
- Download the plugin zip file after purchase from CodeCountry.net
- From your WordPress dashboard, choose Plugins > Add New
Click Upload Plugin at the top of the page.
Click Choose File, locate the plugin .zip file, then click Install Now.
- After the installation is complete, click Activate Plugin.
Certification

This certificate represents that the codecountry.net is an authorized agency of WordPress themes and plugins.




Reviews
There are no reviews yet.