


WHMCS Advanced Menu Manager 1.72.0 With Lifetime Update.
$5.90
| Features | Values |
|---|---|
| Version | v1.72.0 |
| Last Update | 20 November 2023 |
| All Premium Features | Yes |
| Instant Installation Support | 24 Hrs. |
| Website Activation | 25 |
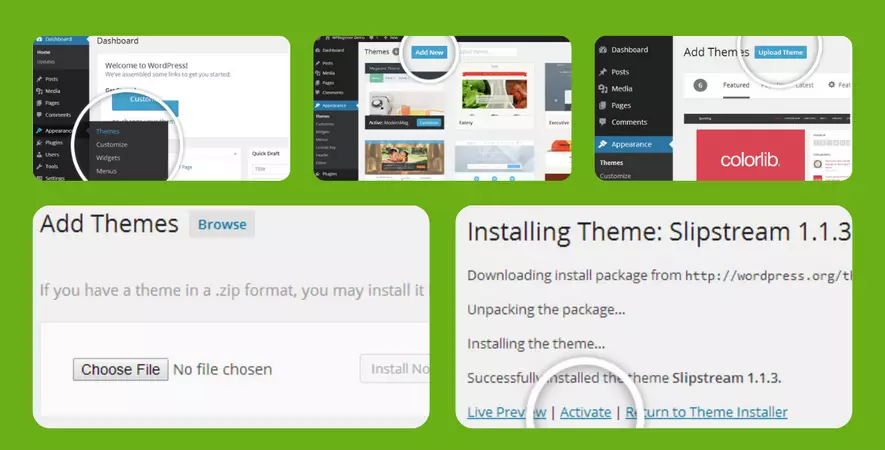
It was hard before to manage WHMCS menu, for example if you want to add new menu item, change it’s place or make it hidden or shown in certain condition, or even to translate the title.
Earlier it required you to know at least the basics of HTML and CSS, or to deal with PHP sometimes.
Now you can do all of this and even more using this module that enables you to do numerous actions like adding unlimited menus and sub-menu items, identifying when and to whom each item will be displayed, add translations to several languages from the same place, changing the order of menu items using Drag-Drop technique, and many more, all of this can be done easily only with few clicks.
KEY FEATURES:
- Add Unlimited Menus and Sub-menu links
- Compatible with WHMCS Six and Five Templates
- Compatible with Custom Templates
- Change menu links ordering with Drag-and-Drop
- Add translation to each item easily
- Add additional attributes to each menu link
- Add core system URL from categorized lists, or external URL
- Add icon to each menu item
- Display stats inside menu links number (ex. Total Active Services, Open Tickets, Due Invoices, etc)
- Visibility Options, Choose when to display specific menu links
- Open URL in the same window or in new window
- Install WHMCS default menu links with one click
- Well Documented
- How to install and use video tutorials
Compatible with WHMCS v6+ and v7+
Only logged in customers who have purchased this product may leave a review.


Reviews
There are no reviews yet.