Store Locator (Google Maps) For WordPress 4.10.14 Plugin With Lifetime Update.
$4.90
| Features | Values |
|---|---|
| Version | v4.10.14 |
| Last Update | 21 November 2024 |
| Documentation | Yes |
| All Premium Features | Yes |
| GPL/Nulled | No |
| Instant Installation Support | 24 Hrs. |
| Receive Updates on Email | Yes |
| Website Activation | 25 |
🌟100% Genuine Guarantee And Malware Free Code.
⚡Note: Please Avoid Nulled And GPL WordPress Plugin.
15
Items sold in last 3 minutes
355
People watching this product now!
Category: WordPress Plugin
Description
Store Locator (Google Maps) For WordPress 4.10.14 Plugin With Lifetime Update.
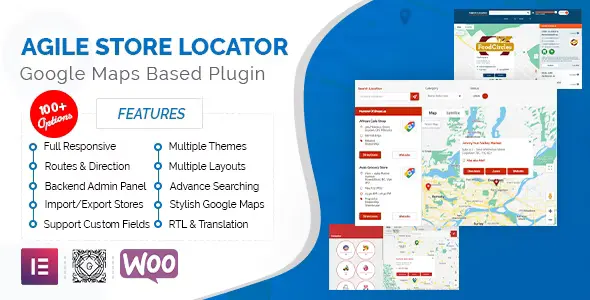
Store Locator (Google Maps) For WordPress Plugin Features.
- 5 Beautiful Themes for frontend.
- Multiple Layouts with Listing and Accordion Option.
- Accordion template with hierarchy of Countries, States, Cities and Stores.
- Color Palette for Google Maps Plugin UI Color Selection.
- Multiple Beautiful InfoWindow.
- Extra Template for Deals Websites to show their exciting deals on Maps.
- Extra Template for Real Estate websites to show their Properties and categorize them into Sale, Rent and Featured.
- Easily customize your info window content, which is a very unique feature.
- Easily customize your store list by just adding few keywords.
- Admin Dashboard for Store Locator with all the stats of your markers, stores, categories and search.
- Analytics Bar Chart to Show user searches which location they have searched most and which store is seen most.
- Analytics Bar Chart to Show Searches, top stores and top locations.
- Time Selection for Each Day for Every Location.
- Duplicate any Store with a Single Click.
- Add Markers with Each Category, Switch between Category Markers and Default Markers.
- 2 Prompt Location dialog for GeoLocation.
- Prompt Location 2nd dialog ask user to enter his Default Location in case site is not using SSL.
- Assign Multiple Categories to single store.
- All the ASL Settings can be Overridden by ShortCode Attributes.
- Add Minimum and Maximum Zoom Level for your google maps.
- Fetch Location Coordinates (Lat/Lng) as you type in store address.
- Too many markers? Enable Marker Clustering.
- Full Width Interactive Google Maps Template.
- Logo Management Panel.
- Marker Manage Panel.
- Choose Stores Time Format 12 or 24 Hours.
- Choose Distance unit Miles/KM.
- Draggable Marker to PinPoint Location.
- Manage Markers icons with names ( UPDATE, ADD and Delete).
- Set the zoom level of marker clicked.
- Manage Categories icons with names ( UPDATE, ADD and Delete).
- Import / Export Stores Excel Sheet with all the columns.
- Delete All Stores with Single Click.
- Choose a Google map type Hybrid, Roadmap, Satellite or Terrain.
- Prompt Location show the dialog box for confirmation to share current location.
- Show Distance to each Store from Current Location.
- Set Default Zoom of your Map.
- Load on bound fetch Only markers of the screen.
- Custom Filter Option.
- Disable Scroll Wheel.
- Show additional Information about Store.
- Enable/Disable Advance Filter.
- Assign Marker to Each Category and Enable Category Markers.
- Draw Shapes/Circle around your best locations.
- Change Placeholder Text for your search field.
- Show Category Icons instead of Marker icons.
- Enable/Disable Distance Slider.
- Set Default Lat/Lng of your Map.
- Change Header Title Text.
- Change font color for default Template.
- Change Category Title Text.
- Enable/Disable Store List Panel.
- Search Stores with Search by search by Store ID, Title, Description, Street, State, City, Phone, Email, URL, Postal Code, Disabled, Marker, Logo and Created Date in the WP-Admin Manage Stores .
- Customize your google maps with Drawing Overlay (Polygon, Rectangle, Circle) of Multiple Colors.
- Choose Maps look and feel from Snazzy Maps.
- Search by Address with auto-panning option.
- Filter Store Locator by Category for multiple store locators.
- Add Google Layers to Show Traffic, Transit and Bike Layers.
- Enable Marker Animation.
- Counter of Total Stores with Live Update as you Pan over Map.
- Restrict your google Search to Country.
- Switch between Google Search and Title Search on Store Locator.
- Enable Full Width for your Plugin.
- Enable/Disable Analytics.
- Enable/Disable Sort by Bound.
- Add Text for “No Item Found”.
- Show Nearest Stores from search location.
- Default Category Selection Option
- Option to select Map Language
- Option to select Map Region for Tiles
- Logo Manger with Listing
- Customization Template within your theme
- Set Fixed Radius Value for Range Slider
- Full Page Map and Fixed
- Set Radius Limit for Slider
- Update Existing Stores using Import
- Open Direction in Google Maps App in Mobile
- Sort by Distance, Name, City, and State
- Custom Ordering Supported
- Radius Circle for Search Range
- Option to set Map top or list on top in mobile devices
- [ASL_SEARCH redirect=”URL-of-Store-Locator”]
- 100+ Advance Options for Admin.
🌟100% Genuine Guarantee And Malware Free Code.
⚡Note: Please Avoid Nulled And GPL WordPress Plugin.
Reviews (0)
Only logged in customers who have purchased this product may leave a review.
Installation Process
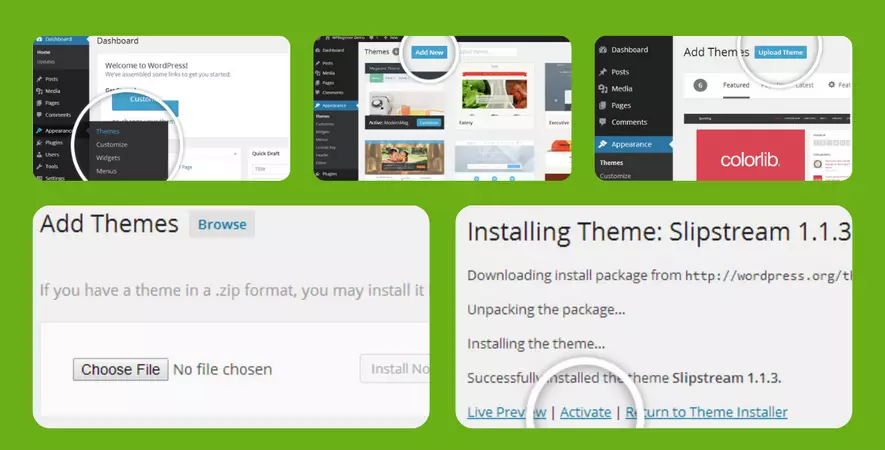
WordPress Theme Installation
- Download the theme zip file after purchase from CodeCountry.net
- Then, log in to your WordPress account and go to Appearance in the menu on the left of the dashboard and select Themes.
On the themes page, select Add New at the top of the page.
After clicking on the Add New button, select the Upload Theme button.
- After selecting Upload Theme, click Choose File. Select the theme .zip folder you've downloaded, then click Install Now.
- After clicking Install, a message will appear that the theme installation was successful. Click Activate to make the theme live on your website.
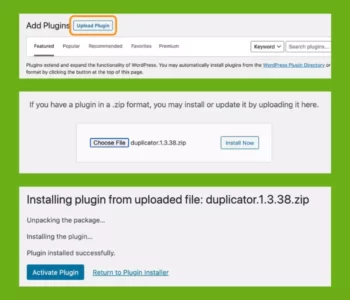
WordPress Plugin Installation
- Download the plugin zip file after purchase from CodeCountry.net
- From your WordPress dashboard, choose Plugins > Add New
Click Upload Plugin at the top of the page.
Click Choose File, locate the plugin .zip file, then click Install Now.
- After the installation is complete, click Activate Plugin.
Certification

This certificate represents that the codecountry.net is an authorized agency of WordPress themes and plugins.




Reviews
There are no reviews yet.