Risetech – Managed IT Services Elementor Template Kit With Lifetime Update
$26.00 Original price was: $26.00.$7.90Current price is: $7.90.
| Features | Values |
|---|---|
| Version | v1.0.0 |
| Last Update | 13 July 2023 |
| Premium Item | Yes |
| Instant Installation Support | 24 Hrs. |
| Website Activation | Unlimited |
Risetech is a modern and clean Managed IT services Template Kit for creating professional and fully functional WordPress-based websites without writing a single line of code. Risetech is fully responsive and retina-ready, and comes with several features to offer, such as templates that will be the perfect starting point for Managed IT, Cybersecurity, IT system maintenance, IT Consulting, and any Managed Cloud.
This template kit includes 20+ carefully crafted templates so you can build your professional website just a click away.
Features:
- Modern & Clean Design
- 10+ Ready to use templates
- Fully Responsive Layout
- Retina Ready
- Fully Customizable
- Cross Browser Compatibility: Chrome, Firefox, Safari, Opera
Templates Include:
- Home
- Services
- Services Detail
- Industry
- Pricing
- Testimonial
- Team
- FAQ
- 404
- Blog
- Single post
- About
- Contact
- Header
- Footer
- Global Theme Style
Plugins installed with kit:
- Free Elementor
- ElementsKit Lite
- MetForm
- Jeg Elementor Kit
How to Install:
- Install and Activate the “Envato Elements” plugin from Plugins > Add New in WordPress
- Do not unzip
- Go to Elements > Installed Kits and click the Upload Template Kit button.
- Before importing a template, ensure the Install Requirements button is clicked to activate required plugins
- For best results, do not import more than one template at a time.
- Go to Pages and create a new page and click Edit with Elementor
- Click the gear icon at lowerleft of the builder to view page settings and choose Elementor Full Width and hide page title
- Click the gray folder icon to access My Templates tab and then Import the page you’d like to customize
How to Import Metforms
- Import the metform block templates
- Import the page template where the form appears and right-click to enable the Navigator
- Locate and select the Metform widget and click Edit Form. Choose New, then Edit Form. The builder will appear
- Click ‘Add Template’ grey folder icon.
- Click ‘My Templates’ tab.
- Choose your imported metform template, then click ‘Insert’ (click No for page settings).
- Once the template is loaded, make any desired customizations and click ‘Update & Close’ The form will appear in the template
- Click Update
Setup Global Header and Footer in Header Footer & Blocks plugin
- Import the header and footer template
- Go to Appearance > Header Footer and click Add New button
- Give it a title and select Header, Display on Entire Site and click Publish
- Click Edit with Elementor
- Click the gray folder icon to access My Templates tab and select the header template to import and Update.
- Repeat for Footer
Only logged in customers who have purchased this product may leave a review.

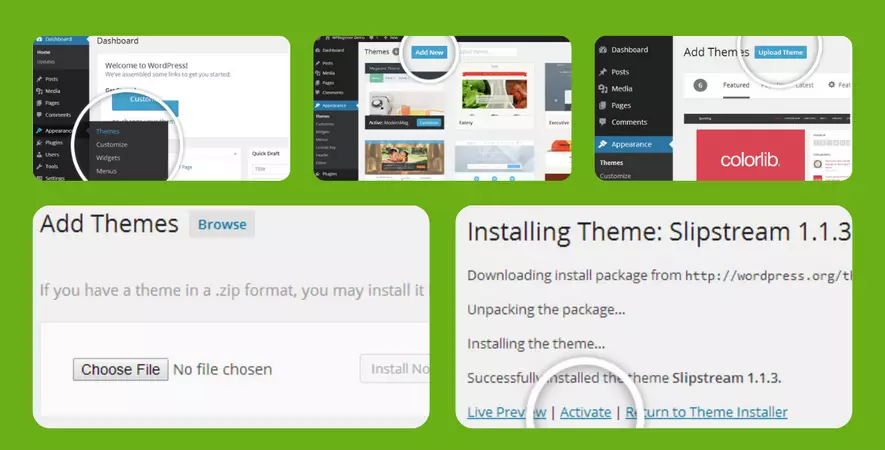
WordPress Theme Installation
- Download the theme zip file after purchase from CodeCountry.net
- Then, log in to your WordPress account and go to Appearance in the menu on the left of the dashboard and select Themes.
On the themes page, select Add New at the top of the page.
After clicking on the Add New button, select the Upload Theme button.
- After selecting Upload Theme, click Choose File. Select the theme .zip folder you've downloaded, then click Install Now.
- After clicking Install, a message will appear that the theme installation was successful. Click Activate to make the theme live on your website.
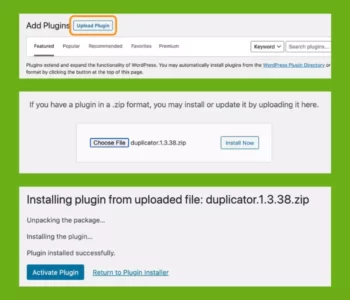
WordPress Plugin Installation
- Download the plugin zip file after purchase from CodeCountry.net
- From your WordPress dashboard, choose Plugins > Add New
Click Upload Plugin at the top of the page.
Click Choose File, locate the plugin .zip file, then click Install Now.
- After the installation is complete, click Activate Plugin.


This certificate represents that the codecountry.net is an authorized agency of WordPress themes and plugins.


Reviews
There are no reviews yet.