PublishPress Future Pro 3.1.5 With Lifetime Update.
$9.90
| Features | Values |
|---|---|
| Version | v3.1.5 |
| Last Update | 18 December 2023 |
| All Premium Features | Yes |
| Instant Installation Support | 24 Hrs. |
| Scanned By Virus Total | ✅ |
| Live Preview |
PublishPress Future allows you to schedule changes to posts on a future date

The PublishPress Future plugin allows you to schedule automatic changes to posts, pages and other content types.
With this plugin you can create automatic actions to unpublish, delete, trash, and sticky a post. It also allows you to create an automatic action to change the status, update the categories and much more.
The main features of PublishPress Future

Select action dates when editing a post
You can select future action dates in the right sidebar when you are editing a post. This works with Gutenberg, the Classic Editor, and most page builder plugins.
Quick Edit and Bulk Edit support
You can modify action dates using the “Quick Edit” and “Bulk Edit” modes. This enables you to quickly add automatic actions to as many posts as you need.


Automatically modify, remove or delete content
PublishPress Future allows you to modify, remove or completely delete content when the scheduled date arrives.
Email notifications
The PublishPress Future plugin can send you email notifications when automatic actions happen on your content.


Custom post type support
PublishPress Future allows you to choose action dates for posts, pages, WooCommerce products, LearnDash classes, or any other custom post types.
Display action dates
PublishPress Future allows you to automatically show the scheduled date inside your articles. The action date will be added at the bottom of your post. You can also use shortcodes to show the action date and customize the output.


Action Logs
The PublishPress Future plugin creates a log of all the modified posts. This allows you to have a detailed record of all the automatic actions for your posts.
Support for custom statuses
PublishPress Future Pro supports custom statuses such as those provided by WooCommerce. This means that Pro users can set their content to move to any status in WordPress.

Only logged in customers who have purchased this product may leave a review.
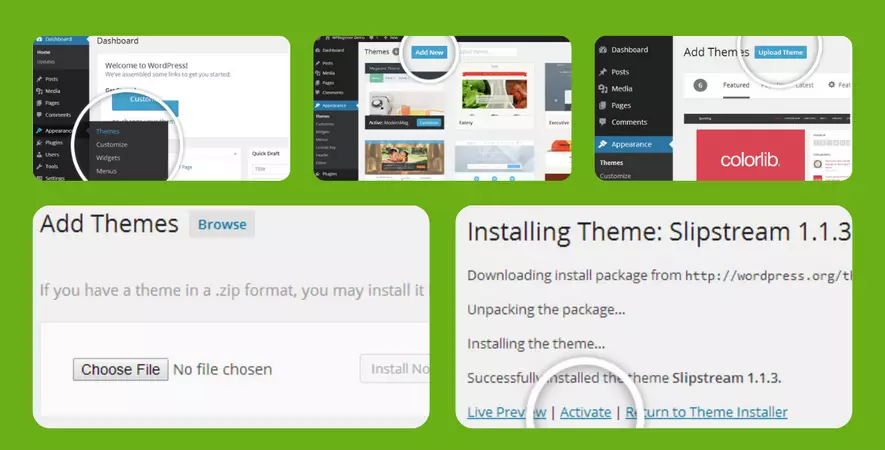
WordPress Theme Installation
- Download the theme zip file after purchase from CodeCountry.net
- Then, log in to your WordPress account and go to Appearance in the menu on the left of the dashboard and select Themes.
On the themes page, select Add New at the top of the page.
After clicking on the Add New button, select the Upload Theme button.
- After selecting Upload Theme, click Choose File. Select the theme .zip folder you've downloaded, then click Install Now.
- After clicking Install, a message will appear that the theme installation was successful. Click Activate to make the theme live on your website.
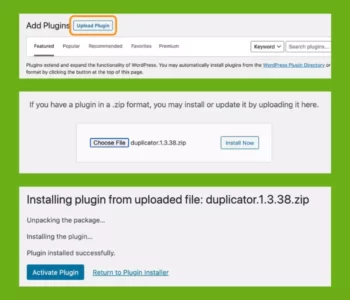
WordPress Plugin Installation
- Download the plugin zip file after purchase from CodeCountry.net
- From your WordPress dashboard, choose Plugins > Add New
Click Upload Plugin at the top of the page.
Click Choose File, locate the plugin .zip file, then click Install Now.
- After the installation is complete, click Activate Plugin.

This certificate represents that the codecountry.net is an authorized agency of WordPress themes and plugins.






Reviews
There are no reviews yet.