

Invoices Laravel Invoice Management System Billing Management
$6.90
| Features | Values |
|---|---|
| Version | Original |
| Last Update | 2023-04-01 |
| Documentation | Yes |
| All Premium Features | Yes |
| GPL/Nulled | No |
| Instant Installation Support | 24 Hrs. |
| Receive Updates on Email | Yes |
| Website Activation | 25 |
🌟100% Genuine Guarantee And Malware Free Code.
⚡Note: Please Avoid Nulled And GPL PHP Script tools.
| Developer |
infyomlabs |
|---|
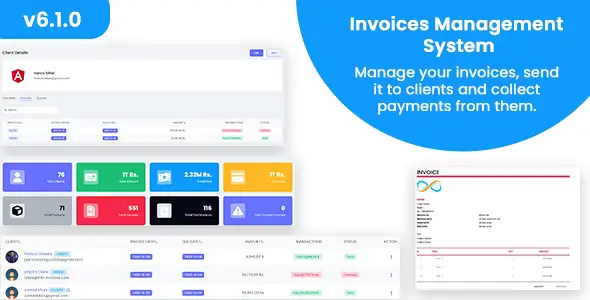
Invoices Laravel Invoice Management System Billing Management.
Here are some Key Features and Concepts that InfyHMS-Saas provides.
Multi-languages Support
We are supporting 9 languages in each panel (Admin | Client)
- English
- Spanish
- French
- German
- Russian
- Portuguese
- Arabic
- Chinese
- Turkish
Admin Panel
Dashboard
Powerful admin dashboard where admin can see the overview of the application, what’s going on, what are the revenue, etc.
Clients
You can create a client from the admin panel, and yes of course clients will get their separate panel, where they can see his assigned/sent invoices and perform related actions.
Products
You can create your products from where, which will be later used in invoice creation. You can define the price, set image, and related information.
Product Categories
You can create different kinds of product categories which will be used in product creation, you can choose categories while creating products.
Taxes
You can create different kinds of taxes from here, e.g GST / IGST / etc with related percentages. Taxes will be used while creating the invoice.
Transactions
All the invoices transactions will be listed here, either it will be manually or via stripe. you can see the detailed information here.
Settings
You can manage to generate settings from here, like the app logo, favicon the currency, and company address.
Also, you can manage the number format and decimal separator settings from here.
Invoice Template
We are supporting the beautiful invoice template, which is used when you print the invoice template. You can manage the downloaded invoice format by using this interface.
Multi Currency
You can add your currency here, whatever you want to show before the price everywhere. The selected currency will be reflected everywhere in the project.
Multi-Lingual
It comes up with 9 different languages and multi-currency options.
Client Panel
Dashboard
Attractive and Powerful dashboard from where the client can see the overview of his invoices, how many invoices are still pending or paid, etc.
Invoices
The client can see only assigned invoices, he can print invoices and check details of them. Also, clients can pay the invoice manually or via the stripe payment gateway.
Pay Invoice
Clients can pay invoices in multiple ways. We are supporting the partial payment option, so let’s say there is a $1000 invoice and the client wants to pay just $500 then he can choose Partial payment while paying the invoice.
Later when the client does the next payment he will just see $500 remains as he already paid $500.
Print Invoices
Clients can print the invoices from the details screen, we are supporting the attractive invoices templates.
Only logged in customers who have purchased this product may leave a review.
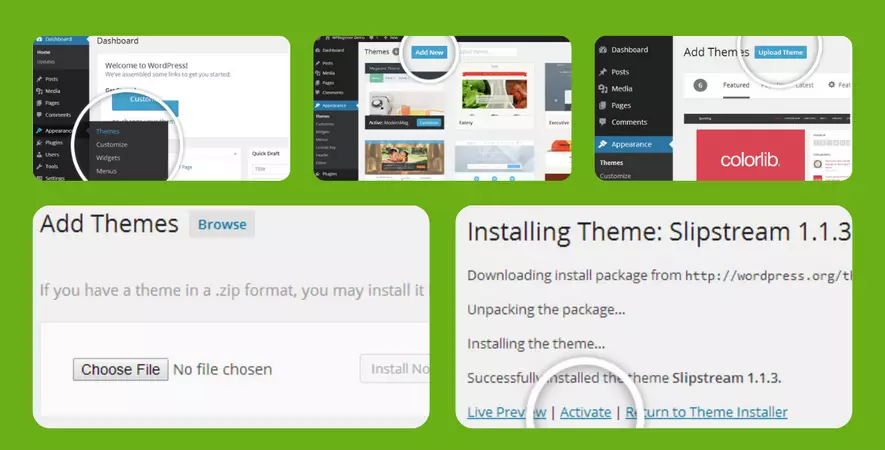
WordPress Theme Installation
- Download the theme zip file after purchase from CodeCountry.net
- Then, log in to your WordPress account and go to Appearance in the menu on the left of the dashboard and select Themes.
On the themes page, select Add New at the top of the page.
After clicking on the Add New button, select the Upload Theme button.
- After selecting Upload Theme, click Choose File. Select the theme .zip folder you've downloaded, then click Install Now.
- After clicking Install, a message will appear that the theme installation was successful. Click Activate to make the theme live on your website.
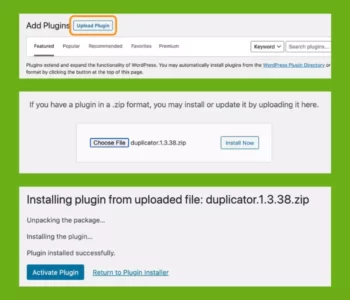
WordPress Plugin Installation
- Download the plugin zip file after purchase from CodeCountry.net
- From your WordPress dashboard, choose Plugins > Add New
Click Upload Plugin at the top of the page.
Click Choose File, locate the plugin .zip file, then click Install Now.
- After the installation is complete, click Activate Plugin.

This certificate represents that the codecountry.net is an authorized agency of WordPress themes and plugins.






Reviews
There are no reviews yet.