CHAT – Infix LMS Module With Lifetime Update.
$5.90
| Features | Values |
|---|---|
| Version | v1.3.0 |
| Last Update | 7 November 2023 |
| Premium Features | Yes |
| Instant Installation Support | 24 Hrs. |
| Scanned By Virus Total | ✅ |
| Live Preview | 100% Working |
The Chat Module for InfixLMS enables communication between admin, students, and instructors. Admin can chat with any student or instructor, while instructors can only chat with students enrolled in their courses. The module supports both Pusher and jQuery, with an invitation requirement for chatting. Admin can initiate chats without invitations and create group chats.
Features
- Chat with anyone
- Chat with Instructor
- Chat with Student
- Student can chat with Instructor
- Admin can chat Student and Instructor
- Blocked User
- Pusher and jQuery
- Admin Can Chat Without Invitation
- Open Chat System
- invitation Requirement
- Generate Teacher And Student Connection For Old Courses
- Can Upload File
- Can Make Group
- Upload File Limit
🌟100% Genuine Guarantee And Malware Free Code.
⚡Note: Please Avoid Nulled And GPL PHP Scripts.
Only logged in customers who have purchased this product may leave a review.
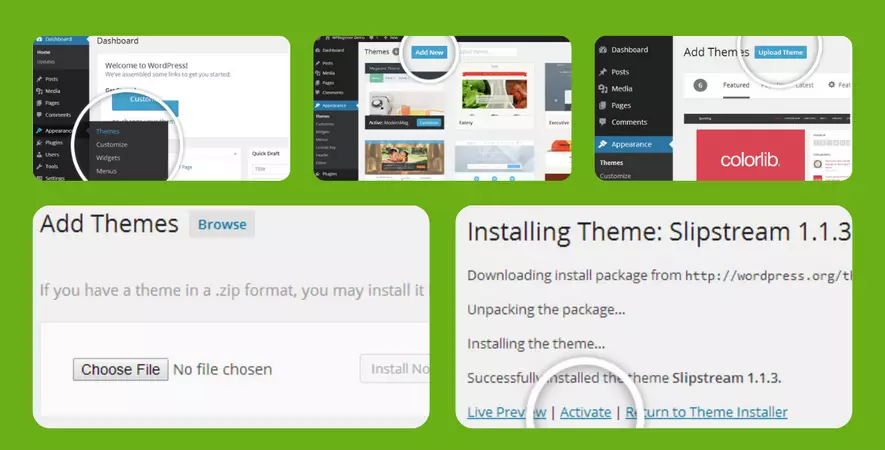
WordPress Theme Installation
- Download the theme zip file after purchase from CodeCountry.net
- Then, log in to your WordPress account and go to Appearance in the menu on the left of the dashboard and select Themes.
On the themes page, select Add New at the top of the page.
After clicking on the Add New button, select the Upload Theme button.
- After selecting Upload Theme, click Choose File. Select the theme .zip folder you've downloaded, then click Install Now.
- After clicking Install, a message will appear that the theme installation was successful. Click Activate to make the theme live on your website.
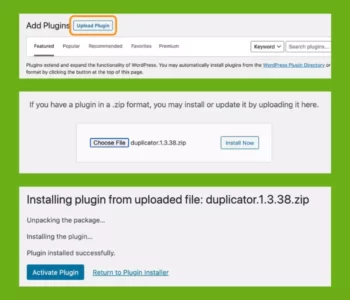
WordPress Plugin Installation
- Download the plugin zip file after purchase from CodeCountry.net
- From your WordPress dashboard, choose Plugins > Add New
Click Upload Plugin at the top of the page.
Click Choose File, locate the plugin .zip file, then click Install Now.
- After the installation is complete, click Activate Plugin.

This certificate represents that the codecountry.net is an authorized agency of WordPress themes and plugins.







Reviews
There are no reviews yet.