Campaign Scheduler for MailWizz EMA With Lifetime Update.
$7.90
| Features | Values |
|---|---|
| Version | v1.2 |
| Last Update | 08 April 2024 |
| Premium Features | Yes |
| Instant Installation Support | 24 Hrs. |
| Scanned By Virus Total | ✅ |
| Live Preview | 100% Working |
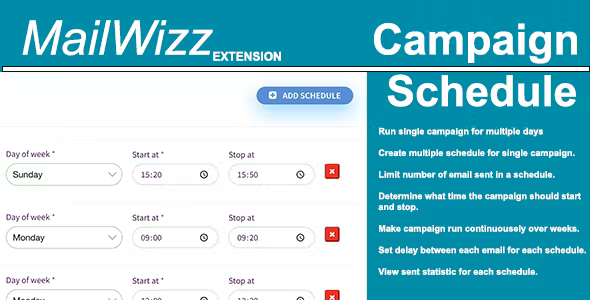
Effortlessly plan your campaigns with precision. Schedule the number of subscribers to receive your campaign at specific dates and times without overloading your server.
This extension integrates seamlessly with MailWizz EMA, allowing you to create schedules for your campaigns. You’ll need a copy of MailWizz EMA to utilize this feature.
Whether you’re running a campaign for a few days or several weeks, you can set up a schedule based on your preferences. The schedule automatically stops when all subscribers have received the email. For example, you can create a campaign to send emails only on Mondays and Fridays to a particular list of subscribers until everyone on the list has been reached. Ready to streamline your campaign management?
FEATURES
- Run single campaign for multiple days till every mail sent out!
- Create multiple schedule for single campaign.
- Limit number of email sent in a schedule.
- Multiple schedule can be planned for a single day.
- Determine what time the campaign should start and stop.
- Make campaign run continuousely (till all members are mailed) over days or weeks.
- Determine speed; Set delay between each email for each schedule.
- View sent statistic for each schedule.
🌟100% Genuine Guarantee And Malware Free Code.
⚡Note: Please Avoid Nulled And GPL PHP Scripts.
Only logged in customers who have purchased this product may leave a review.
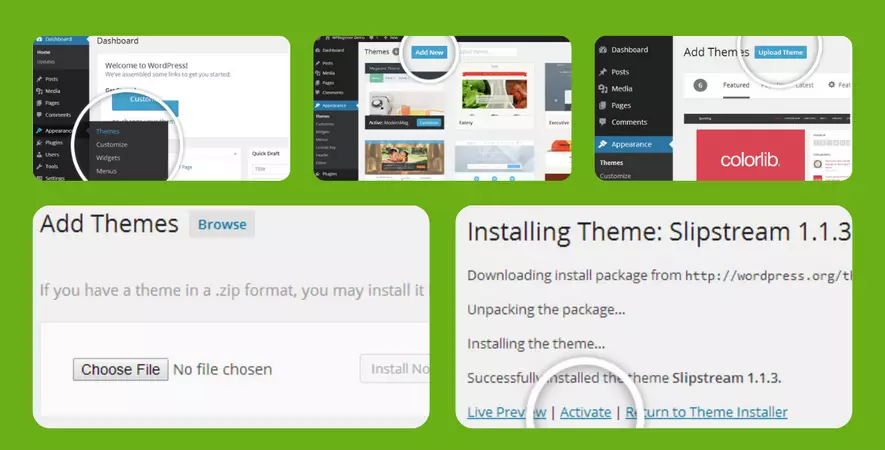
WordPress Theme Installation
- Download the theme zip file after purchase from CodeCountry.net
- Then, log in to your WordPress account and go to Appearance in the menu on the left of the dashboard and select Themes.
On the themes page, select Add New at the top of the page.
After clicking on the Add New button, select the Upload Theme button.
- After selecting Upload Theme, click Choose File. Select the theme .zip folder you've downloaded, then click Install Now.
- After clicking Install, a message will appear that the theme installation was successful. Click Activate to make the theme live on your website.
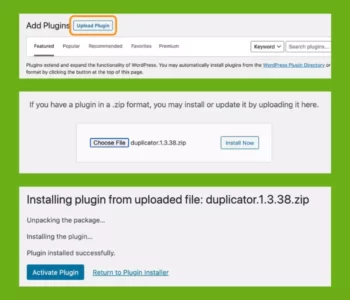
WordPress Plugin Installation
- Download the plugin zip file after purchase from CodeCountry.net
- From your WordPress dashboard, choose Plugins > Add New
Click Upload Plugin at the top of the page.
Click Choose File, locate the plugin .zip file, then click Install Now.
- After the installation is complete, click Activate Plugin.

This certificate represents that the codecountry.net is an authorized agency of WordPress themes and plugins.








Reviews
There are no reviews yet.