


Booked Appointment Booking for WordPress With Lifetime Update
$5.90
Booked Appointment Booking for WordPress With Lifetime Update
| Features | Values |
|---|---|
| Version | v2.4.3 |
| Last Update | February 23, 2023 |
| Documentation | Yes |
| All Premium Features | Yes |
| GPL/Nulled | No |
| Instant Installation Support | 24 Hrs. |
| Receive Updates on Email | Yes |
| Website Activation | 25 |
Booked Appointment Booking for WordPress With Lifetime Update
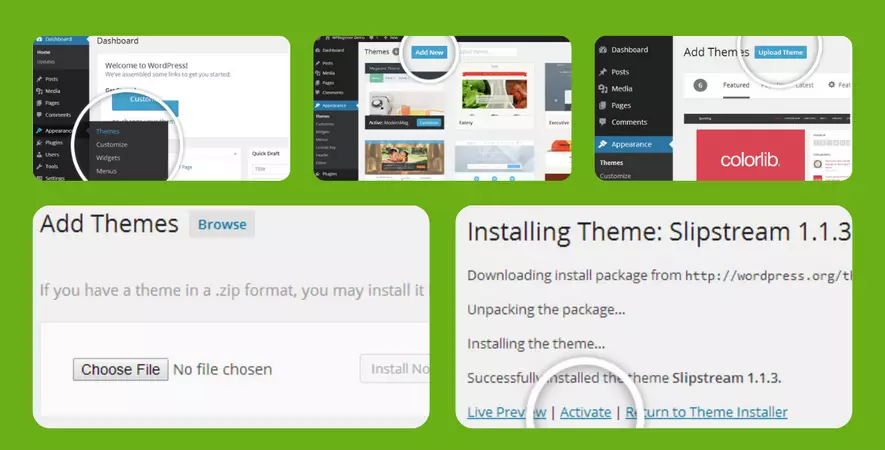
Booked WordPress Plugin Features
Calendar shortcodes for appointments and widgets.
Custom time slots for holidays, closed dates, and much more.
Custom Fields that collect customized details for each appointment.
A robust backend interface that can organize appointments.
Color pickers to alter the colors of your calendar.
The buffering of appointments is to stop appointments from being booked in the too-close proximity to the or on the same day.
Customers are able to manage their own schedules.
Customers can control their account details.
“Add Google Calendar” and “Add to Google Calendar” buttons for your clients.
Customizable email messages sent to you or your customer.
Both admin and front-end are completely functional and responsive.
Fully translatable
Color customization
🌟100% Genuine Guarantee And Malware Free Code.
⚡Note: Please Avoid Nulled And GPL WordPress Plugin
7 reviews for Booked Appointment Booking for WordPress With Lifetime Update
Only logged in customers who have purchased this product may leave a review.


Adeline –
Wished I had found this sooner, it took me a lot of money and time until I found my dream product here!
Catalina –
I rarely leave a comment, but this item is beyond worth it! Gotta let you guys know!
Fanny –
Good response from the support.
Justina –
I want to say thanks to the support team for helping with my continuously silly questions, you’re the best!
Tatum –
Think everyone should know about this, it’s just beyond my expectations
Chet –
The first time I got the urges to leave a comment, but this is simply a top-notch thing you can find.
Julian –
This is the coolest thing I’ve found on here! Will keep using your products in the future!