Betternet ISP Billing with Mikrotik API With Lifetime Update.
$13.90
| Features | Values |
|---|---|
| Version | v4.0 |
| Last Update | 28 July 2023 |
| Premium Features | Yes |
| Instant Installation Support | 24 Hrs. |
| Scanned By Virus Total | ✅ |
| Live Preview | 100% Working |
The betternet is an all-in-one Internet Service Providers (ISP) Management System. The latest version introduces numerous enhancements, such as improved Mikrotik API support for both new and legacy RouterOS systems, log monitoring, reseller options, and separate panels for resellers, accountants, and support executives with distinct access and tasks. It also includes features like mass and single user billing and payment, employee salary management, and office income and expense management, along with detailed reports.
Features
- ISP Billing management
- Mikrotik API
- Package management
- User management
- Stripe payment gateway
- Once click bill generation for all users
- Disalbe all users with due bill in a single click
- Payment invoice download
- Ticket based support
- Enable/ disable single user
- Change user package
- Mikrotik log download
- User profile
- User billing
- User payment
- All Users report
- Individual User report
- Billing report
- Payment report
🌟100% Genuine Guarantee And Malware Free Code.
⚡Note: Please Avoid Nulled And GPL PHP Scripts.
Only logged in customers who have purchased this product may leave a review.
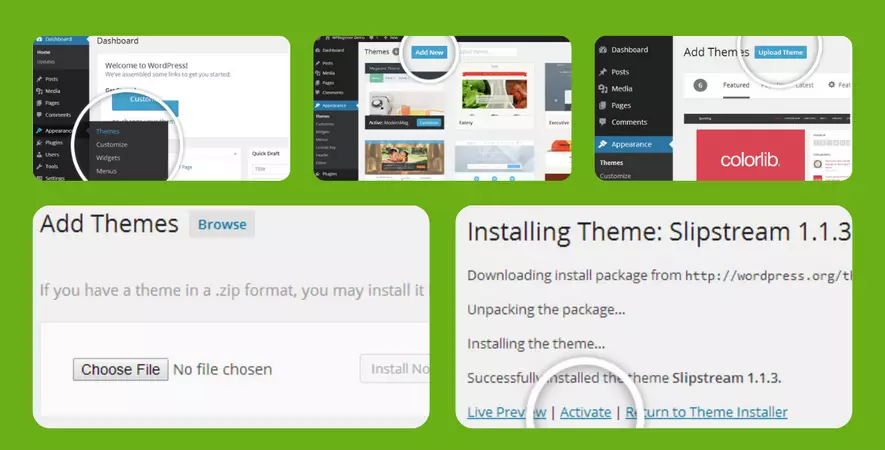
WordPress Theme Installation
- Download the theme zip file after purchase from CodeCountry.net
- Then, log in to your WordPress account and go to Appearance in the menu on the left of the dashboard and select Themes.
On the themes page, select Add New at the top of the page.
After clicking on the Add New button, select the Upload Theme button.
- After selecting Upload Theme, click Choose File. Select the theme .zip folder you've downloaded, then click Install Now.
- After clicking Install, a message will appear that the theme installation was successful. Click Activate to make the theme live on your website.
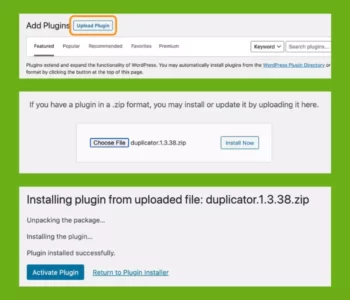
WordPress Plugin Installation
- Download the plugin zip file after purchase from CodeCountry.net
- From your WordPress dashboard, choose Plugins > Add New
Click Upload Plugin at the top of the page.
Click Choose File, locate the plugin .zip file, then click Install Now.
- After the installation is complete, click Activate Plugin.

This certificate represents that the codecountry.net is an authorized agency of WordPress themes and plugins.








Reviews
There are no reviews yet.