Atlas Business Directory Listing 2.1.0 PHP Script With Lifetime Update.
$7.84
| Features | Values |
|---|---|
| Version | v2.1.0 |
| Last Update | 4 October 2024 |
| Documentation | Yes |
| All Premium Features | Yes |
| GPL/Nulled | No |
| Instant Installation Support | 24 Hrs. |
| Receive Updates on Email | Yes |
| Website Activation | 25 |
🌟100% Genuine Guarantee And Malware Free Code.
⚡Note: Please Avoid Nulled And GPL CMS PHP Scripts.
| Developer |
Creativeitem |
|---|
Atlas Business Directory Listing is a comprehensive platform designed to help businesses maximize their online presence and reach a wider audience. With its user-friendly interface and powerful features, Atlas offers an exceptional directory listing experience.
Businesses can create detailed profiles with essential information, such as contact details, business description, operating hours, and location.The directory also allows businesses to add images, videos, and links to their website and social media accounts, enhancing their visibility and providing a more engaging experience for potential customers.
Atlas offers advanced search and filtering options, enabling users to find specific businesses based on categories, keywords, or location. Users can read and leave reviews, helping businesses build trust and credibility within the community.
With its responsive design, Atlas ensures that businesses are accessible on various devices, including desktops, tablets, and mobile phones. The platform also offers SEO optimization, boosting businesses’ search engine rankings and driving organic traffic.
Additionally, Atlas provides analytics and insights, allowing businesses to track their performance and make data-driven decisions to improve their online presence and marketing strategies.
Overall, Atlas Business Directory Listing offers a comprehensive solution for businesses to expand their reach, attract new customers, and establish a strong online presence in their industry.
Atlas Business Directory Listing 2.1.0Features,
Quick start guide for admin
- Please go through the “Installation and Update” guide carefully if you haven’t installed the application yet.
- Login as site administrator to organize your system.
- At first update your System Settings and Payment Settings from Settings option of the left sidebar menu. Also, make sure to provide a valid YouTube API key and a valid Vimeo API key on System Settings.
- If you have updated the Settings successfully, you can go to Categories option from the same left sidebar menu and create Categories.
- You will need to add cities against the country before creating a listing.
- After creating category and city, now you will be able to create listings. Go to Add New Listing sub-menu from the Listings menu from the left sidebar and fill the required fields and hit the Submit button.
Quick start guide for customers
- First you will need to get registered before creating a listing.
- If you’ve done it right, login with your registered email and password.
- For creating a listing you will need to have a valid package.
- If you are successful registered user and you have a valid package, the you are ready to create listings.
- Go to Add New Listing sub-menu from the Listings menu from the left side bar and fill the required fields and hit the Submit button.
About Atlas
Want to make a professional business directory site? Atlas gives you the best platform to build one in minutes. It is highly customizable and the easiest script in the market to set up and organize your business directory portal. All modern functionalities of directory listing are integrated into Atlas which makes it industry standard and gives a robust solution to grow up your business.
Directory Portal features
- Dynamic home page with search bar and top listings
- Category wise directory browsing
- Dedicated category & sub-category page with summary
- Advanced directory filtering page
- Filter listings with category, amenities, pricing, cities, video
- Locate listings in map as marker with informative popover
- Map interaction with listing search result for ease of access
- Directory’s wide banner image
- All categories in listing page
- Unlimited photo gallery image for any directory
- Amenities listing of a directory
- Weekly opening & closing hours schedule
- Currently closed or opening status
- Video embed option from youtube, vimeo, html5
- Social media sharing option for listing
- Customer reviews and rating form
- Review summary view sorted by star rating
- Report inappropriate listing to admin to review
- Contact form for business customers
- Listing can be added to wishlist from thumbnail and detail page
- Price table for purchasing directory posting package
- Company details and legal pages: about, t&c, privacy policy, faq
- Dynamic footer
- 404 error page configuration
Business specific features
- Customized directory layout for restaurant, hotel, shop
- Food menu showing custom layout for restaurant directories
- Table booking custom contact form for restaurant directories
- Room detail custom layout for hotel directories
- Room booking custom form for hotel directories
- Product showing custom layout for shopping directories
Admin features
- Easy installation process
- Setup guide provided with product documentation
- Most flexible listing creation form
- Make listing pending/active with just one click
- Review inappropriate reported listings
- Listing category & subcategory manager
- Listing amenities manager
- Listing cities manager
- Listing rating manager
- Pricing package manager
- Watch customer’s purchase report history
- User database monitoring
- Website settings manager
- Portal’s terms, privacy policy, faq manager
- Payment and currency setup for paypal, stripe
- Multi language translation manager
- Smtp settings setup
- System status monitoring dedicated page
Customer feature
- Dedicated user panel to manage account
- Purchase package and create listing
- Watch package purchase report
- Print or download invoice of purchase
- Create & publish listing following purchased package limit
- Create hotel type directory with room details
- Get room booking orders by making hotel directories
- Create restaurant directories with food menu details
- Get table booking orders by making restaurant directories
- Create shopping directory with product details
- Add favourite directories to wishlist & browse later
- Give rating and reviews to preferred directories
🌟100% Genuine Guarantee And Malware Free Code.
⚡Note: Please Avoid Nulled And GPL CMS PHP Scripts.
Only logged in customers who have purchased this product may leave a review.

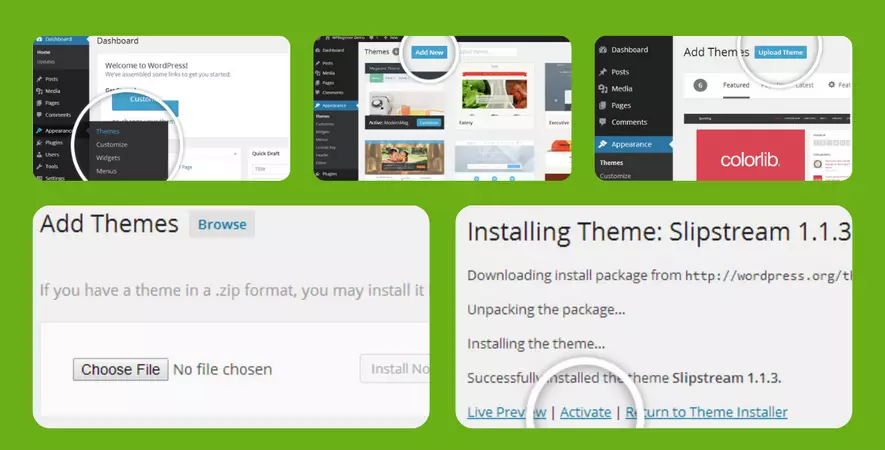
WordPress Theme Installation
- Download the theme zip file after purchase from CodeCountry.net
- Then, log in to your WordPress account and go to Appearance in the menu on the left of the dashboard and select Themes.
On the themes page, select Add New at the top of the page.
After clicking on the Add New button, select the Upload Theme button.
- After selecting Upload Theme, click Choose File. Select the theme .zip folder you've downloaded, then click Install Now.
- After clicking Install, a message will appear that the theme installation was successful. Click Activate to make the theme live on your website.
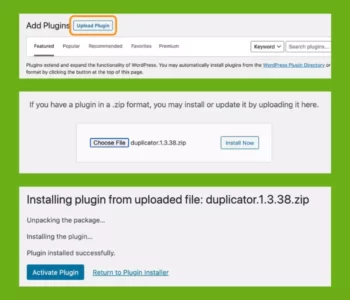
WordPress Plugin Installation
- Download the plugin zip file after purchase from CodeCountry.net
- From your WordPress dashboard, choose Plugins > Add New
Click Upload Plugin at the top of the page.
Click Choose File, locate the plugin .zip file, then click Install Now.
- After the installation is complete, click Activate Plugin.


This certificate represents that the codecountry.net is an authorized agency of WordPress themes and plugins.


Reviews
There are no reviews yet.