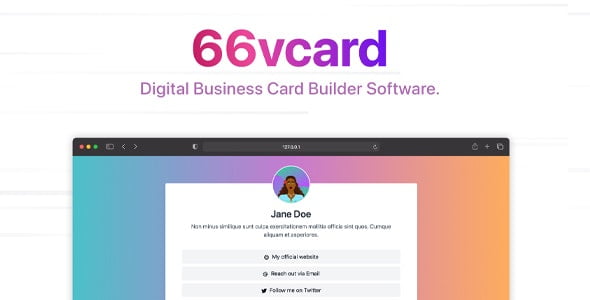
66vcard – Digital Business Card Builder (SAAS) With Lifetime Update.
$9.90
| Features | Values |
|---|---|
| Version | v25.0.0 |
| Last Update | 26 April 2024 |
| Premium Features | Yes |
| Instant Installation Support | 24 Hrs. |
| Scanned By Virus Total | ✅ |
| Live Preview | 100% Working |
66vcard is the premier digital business card builder, offering unparalleled performance, lightweight design, and user-friendly interface. It’s crafted to be a streamlined and cost-effective alternative to our flagship product.
Features
UNLIMITED VCARDS – Users can create as many vcard pages as you allow them, from one single account.
4 VCARD THEMES – You get 4 included, beautiful and performant Vcard page themes.
VCARD QR BUILDER – You’ll be able to generate custom QR Codes for each vcard as well.
UNLIMITED PROJECTS (CATEGORIES) – That users can create to manage and categorize their Vcard pages.
ADVANCED STATISTICS – All vcards get detailed statistics regarding their visitors which access their pages.
LOGIN WITH FACEBOOK / GOOGLE / TWITTER / DISCORD – To help users login to your website faster.
TWO FACTOR AUTHENTICATION – To help your users with their account security.
DARK MODE
RTL LANGUAGES SUPPORT
SEO FRIENDLY – Proper URLs, dynamic titles, highly controllable via per language.
SITEMAP – The full sitemap is automatically generated for you and ready to be used.
and many many more..
Administrative Features
STRIPE PAYMENTS – Earn money by charging One time, Recurring or Lifetime payments from your users for custom plans via Stripe.
PAYPAL PAYMENTS – Earn money by charging One time, Recurring or Lifetime payments from your users for custom plans via Paypal.
OFFLINE PAYMENTS – Earn money by charging offline payments (ex: via bank transfers or other methods). The best way to get paid by your users if you do not use Paypal or Stripe.
COINBASE CRYPTO PAYMENTS – Earn money by charging One time or Lifetime payments from your users for custom plans via Coinbase.
CRYPTO.com CRYPTO PAYMENTS – Earn money by charging One time or Lifetime payments from your users for custom plans via Crypto.com.
RAZORPAY PAYMENTS – Earn money by charging One time, Recurring or Lifetime payments from your users for custom plans via Razorpay.
PAYU PAYMENTS – Earn money by charging One time payments from your users for custom plans via PAYU.
PAYSTACK PAYMENTS – Earn money by charging One time, Recurring or Lifetime payments from your users for custom plans via Paystack.
MOLLIE PAYMENTS – Earn money by charging One time, Recurring or Lifetime payments from your users for custom plans via Mollie.
YOOKASSA PAYMENTS – Earn money by charging One time or Lifetime payments from your users for custom plans via yookassa.com.
PADDLE PAYMENTS – Earn money by charging One time or Lifetime payments from your users for custom plans via Paddle.com.
MERCADOPAGO PAYMENTS – Earn money by charging One time or Lifetime payments from your users for custom plans via MercadoPago.com.
DISCOUNT AND REDEEMABLE CODES – Create unlimited discount or redeemable codes from the admin panel for your users.
TAXES – Easily create, configure taxes and attach them to paid plans.
INVOICING – Configure and generate proper invoices, displaying potential discount codes and applied taxes for your users.
FREE, TRIAL PLAN CUSTOMIZATION – Configure exactly what each defined plan can or can not do or disable them completely.
UNLIMITED CUSTOM PLANS – Create custom made plans for your users.
PAYMENTS – Both you (as the admin) and your users will have access to their payments made on the platform.
MULTILINGUAL READY – Easily translate via the admin panel and run multiple languages for your website. (Note: User generated content is not translatable.)
STATISTICS – Get to know what happens on your website by checking out the statistics page.
USERS – Create, view, edit, ban or delete any user on the platform via the admin panel.
MULTILINGUAL PAGES – Create, view, edit or delete any custom page on the platform via the admin panel.
MULTILINGUAL BLOG – Create, view, edit or delete any blog page or category on the platform via the admin panel.
VCARDS – View or delete any vcard that has been created by your users.
CUSTOM DOMAINS – Allow your users to use multiple domains that you give them access to for Biolink pages or URL Shorteners.
GOOGLE SAFE BROWSWING – Is implemented to help you fight phishing, malware or any threats from sites that spammers will try and link to.
SETTINGS – This is the control page where you update your website and create it exactly as you wish by editing important details enabling or disabling certain features such as.
- Disable the default landing page and redirect to your custom one
- SMTP configuration
- Enable or disable the Registration system
- Enable or disable email confirmation for new users
- Upload your own logo, favicon or opengraph image
- Configure your business and payment settings
- Set up your Social media links
- Add your custom CSS or JavaScript code
- Configure your ad codes to display ads to your users
- Display announcements to your users with ease
- Configure & choose your Captcha (Google, hCaptcha or a simple default one)
- Configure email notifications for admins for certain events
- Fully configurable cookie consent manager & implementation
🌟100% Genuine Guarantee And Malware Free Code.
⚡Note: Please Avoid Nulled And GPL PHP Scripts.
Only logged in customers who have purchased this product may leave a review.
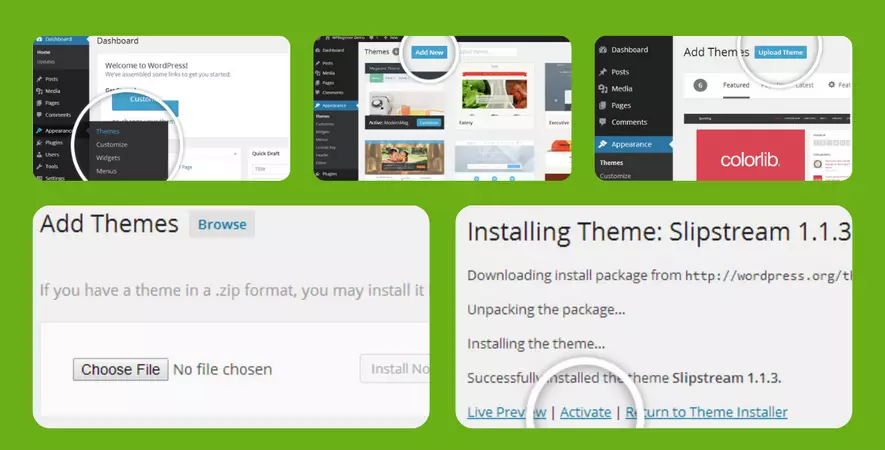
WordPress Theme Installation
- Download the theme zip file after purchase from CodeCountry.net
- Then, log in to your WordPress account and go to Appearance in the menu on the left of the dashboard and select Themes.
On the themes page, select Add New at the top of the page.
After clicking on the Add New button, select the Upload Theme button.
- After selecting Upload Theme, click Choose File. Select the theme .zip folder you've downloaded, then click Install Now.
- After clicking Install, a message will appear that the theme installation was successful. Click Activate to make the theme live on your website.
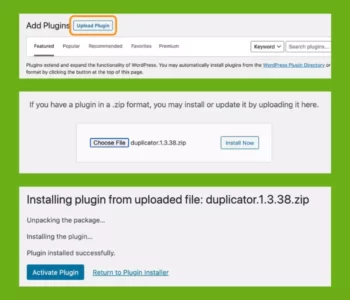
WordPress Plugin Installation
- Download the plugin zip file after purchase from CodeCountry.net
- From your WordPress dashboard, choose Plugins > Add New
Click Upload Plugin at the top of the page.
Click Choose File, locate the plugin .zip file, then click Install Now.
- After the installation is complete, click Activate Plugin.

This certificate represents that the codecountry.net is an authorized agency of WordPress themes and plugins.




Reviews
There are no reviews yet.