Charityx – Charity & Nonprofit WordPress Theme With Lifetime Update.
$6.90
| Features | Values |
|---|---|
| Version | 1.0.1 |
| Last Update | 13 September 2023 |
| Premium Features | Yes |
| Instant Installation Support | 24 Hrs. |
| Scanned By Virus Total | ✅ |
| Live Preview | 100% Working |
20
Items sold in last 3 minutes
337
People watching this product now!
SKU:
50537
Category: Subscription
Description
Charityx Theme Features:
- Drag and Drop Page Builder: Built with Elementor, Charityx offers fast, intuitive, and smart customization, allowing you to publish layouts quickly.
- One-Click Installation: Use our powerful installer to get your site up and running quickly and easily.
- Powerful Framework: Based on the premium Codestar framework, providing robust theme options.
- Slider Revolution: Includes the popular premium slider plugin for free.
- Unlimited Color Options: Customize your site’s colors freely to match your brand.
- Page/Post Options: Override global settings for individual pages or posts to create unique designs.
- Mailchimp Integration: Seamlessly integrate your newsletter subscription with your Mailchimp contact list.
- Compatible with Contact Form 7: Easily create custom forms using the popular WordPress widget.
- Detailed Documentation: Comprehensive documentation and video guides make setup and customization simple and fast.
🌟100% Genuine Guarantee And Malware Free Code.
⚡Note: Please Avoid Nulled And GPL WordPress Themes.
Reviews (0)
Only logged in customers who have purchased this product may leave a review.
Installation Process
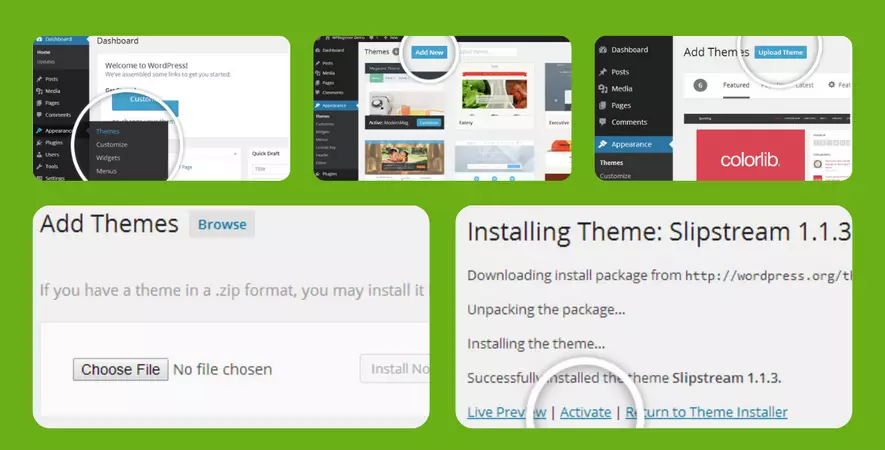
WordPress Theme Installation
- Download the theme zip file after purchase from CodeCountry.net
- Then, log in to your WordPress account and go to Appearance in the menu on the left of the dashboard and select Themes.
On the themes page, select Add New at the top of the page.
After clicking on the Add New button, select the Upload Theme button.
- After selecting Upload Theme, click Choose File. Select the theme .zip folder you've downloaded, then click Install Now.
- After clicking Install, a message will appear that the theme installation was successful. Click Activate to make the theme live on your website.
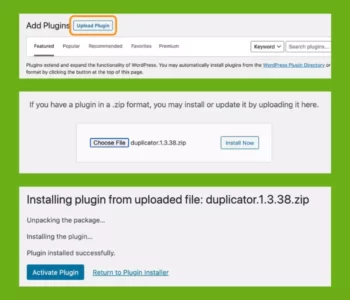
WordPress Plugin Installation
- Download the plugin zip file after purchase from CodeCountry.net
- From your WordPress dashboard, choose Plugins > Add New
Click Upload Plugin at the top of the page.
Click Choose File, locate the plugin .zip file, then click Install Now.
- After the installation is complete, click Activate Plugin.
Certification

This certificate represents that the codecountry.net is an authorized agency of WordPress themes and plugins.
Related products
Soledad 8.5.2 Multipurpose, Newspaper, Blog & WooCommerce WordPress Theme With Lifetime Update
Rated 5.00 out of 5






Reviews
There are no reviews yet.