Resido – Laravel Real Estate Multilingual System With Lifetime Update.
$12.90
| Features | Values |
|---|---|
| Version | v3.2.0 |
| Last Update | 24 April 2024 |
| Premium Features | Yes |
| Instant Installation Support | 24 Hrs. |
| Scanned By Virus Total | ✅ |
| Live Preview | 100% Working |
Resido is a premium real estate related websites build on Laravel. With an advanced admin dashboard that will help you create a local or global real-estate directory site.
Resido provides many different layouts of HOME pages. Perfectly suitable for any agency, agent, property, real estate, rental, corporate, apartment, house, hotels, and all types of real estate directory services.
Resido theme’s built with Bootstrap 4, CSS3 & Jquery with 100% responsive, Retina ready & Multi-Device supported and multilingual support almost all features
All code is beautifully writte & W3C HTML validate coding. All HTML & CSS codes are commented properly so it’s easily customizable.
We’ve added all the features needed for a real estate listing site to this theme. It combines with variant grid layout, list layout style including facilities to create booking submission, agencies and agent admin dashboard, a single property compares property, agencies & agent list, and much more. Resido has everything you need to run a successful real estate business.
🌟100% Genuine Guarantee And Malware Free Code.
⚡Note: Please Avoid Nulled And GPL PHP Scripts.
Only logged in customers who have purchased this product may leave a review.
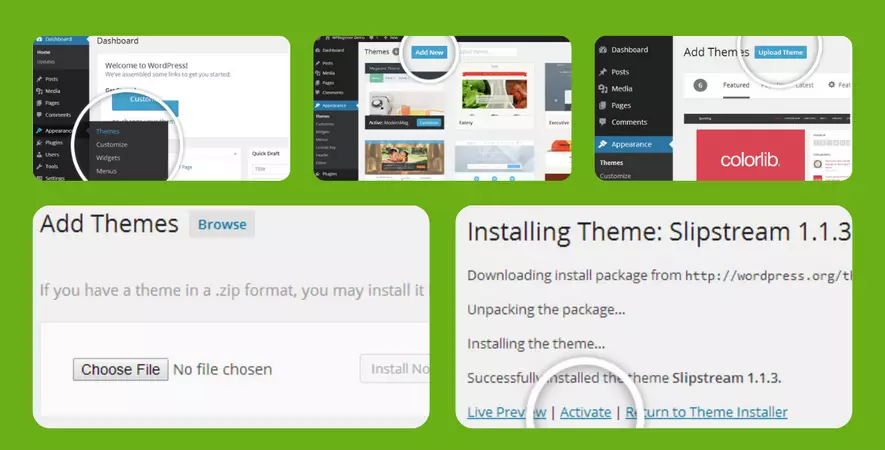
WordPress Theme Installation
- Download the theme zip file after purchase from CodeCountry.net
- Then, log in to your WordPress account and go to Appearance in the menu on the left of the dashboard and select Themes.
On the themes page, select Add New at the top of the page.
After clicking on the Add New button, select the Upload Theme button.
- After selecting Upload Theme, click Choose File. Select the theme .zip folder you've downloaded, then click Install Now.
- After clicking Install, a message will appear that the theme installation was successful. Click Activate to make the theme live on your website.
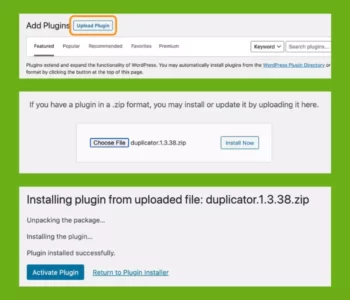
WordPress Plugin Installation
- Download the plugin zip file after purchase from CodeCountry.net
- From your WordPress dashboard, choose Plugins > Add New
Click Upload Plugin at the top of the page.
Click Choose File, locate the plugin .zip file, then click Install Now.
- After the installation is complete, click Activate Plugin.

This certificate represents that the codecountry.net is an authorized agency of WordPress themes and plugins.








Reviews
There are no reviews yet.